BACnet integration example
Use an MQTT gateway to provide data to a BACnet/IP gateway
Note: If you want an even simpler solution using only one gateway device with dynamic data-mapping, please view theWeble BACnet Gateway guide instead.
Accessing data from Airthings for Business devices and translating it to BACnet can be done with several different devices and software, but configuring those often requires some existing knowledge and experience with them. We’ve tested quite a few of these solutions, and decided to write a guide on one of the devices with the simplest configuration to get you up and running as quickly as possible.
This example uses a Unipi Gate device to connect to the Airthings MQTT broker and offer the data to MQTT clients on the local network. The ADF Web HD67938-IP-B2 then subscribes to the data from the Unipi Gate and translates it to BACnet IP.
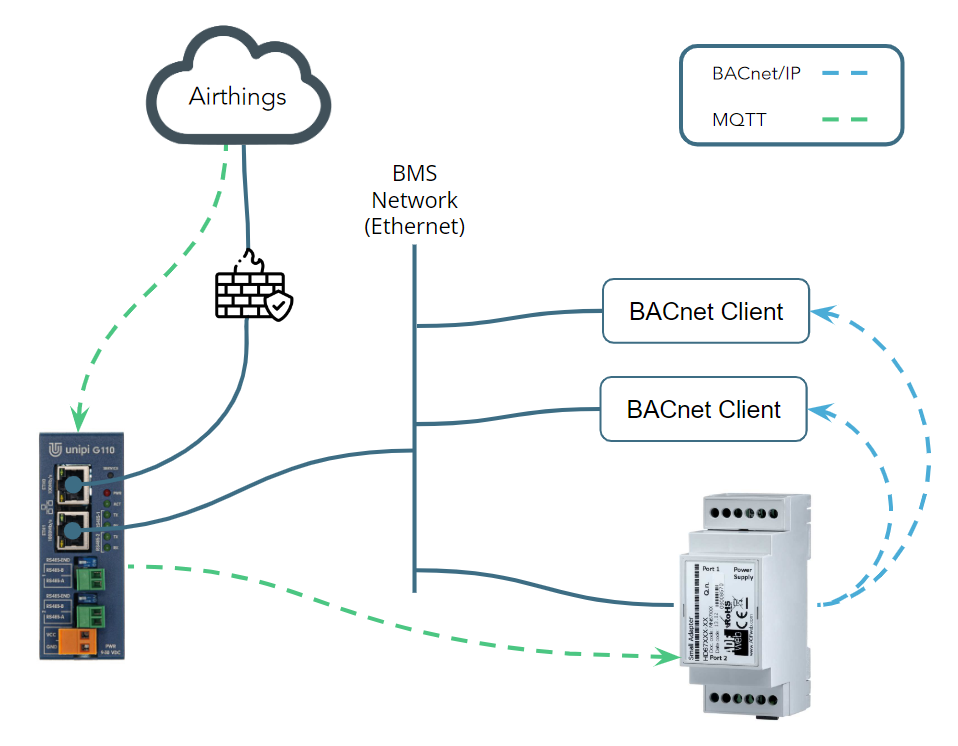
The solution offers devices connected to the local network the option to either get the sensor data using BACnet or MQTT. It also presents the possibility to offer data on other protocols, or make advanced logic on the Unipi through it’s Node-RED service.
Requirements
To get the solution up and running, you will need the following:
- An active Airthings for Business account with sensor-devices registered to it
- Unipi Gate G100 or G110
- ADF Web HD67938-IP-B2
- An Ethernet network with Internet connection
- An Ethernet network with BACnet IP client device(s) (this can be the same network as the one with Internet connection, or a separate one)
- A computer with Windows OS to configure the devices
The MQTT Bridge guide explains how to set up the Unipi Gate device, so complete that guide before you start installing and configuring the ADF Web device as explained in this guide.
Device configuration
The ADF Web device is configured from a software provided by ADF Web, called "SW67938". This software - as well as the user manuals - can be downloaded from ADF Web’s download page. Please install the software on your computer, and read the manuals to understand how to properly configure the device.
Airthings configuration template
Before opening the configuration software, navigate to C:\Program Files (x86)\ADFweb\Compositor_SW67938\Projects on your computer and create a new folder named Unipi. Extract the content of this example configuration into that folder.
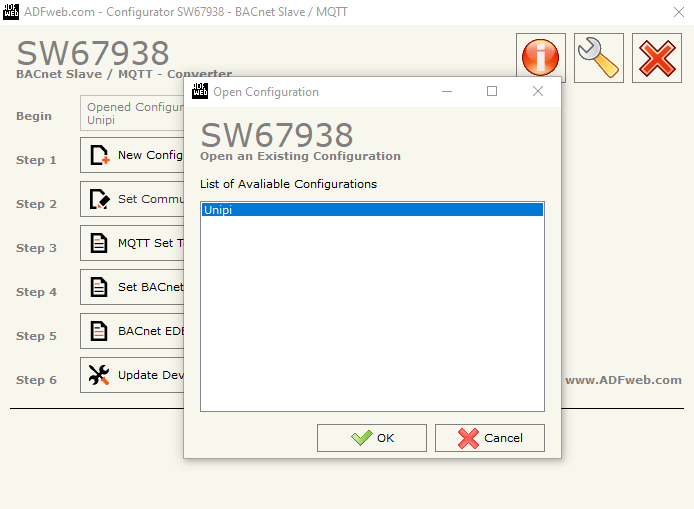
Open the configuration software, click the Open Configuration button, and select the “Unipi” configuration you previously added.
Device settings
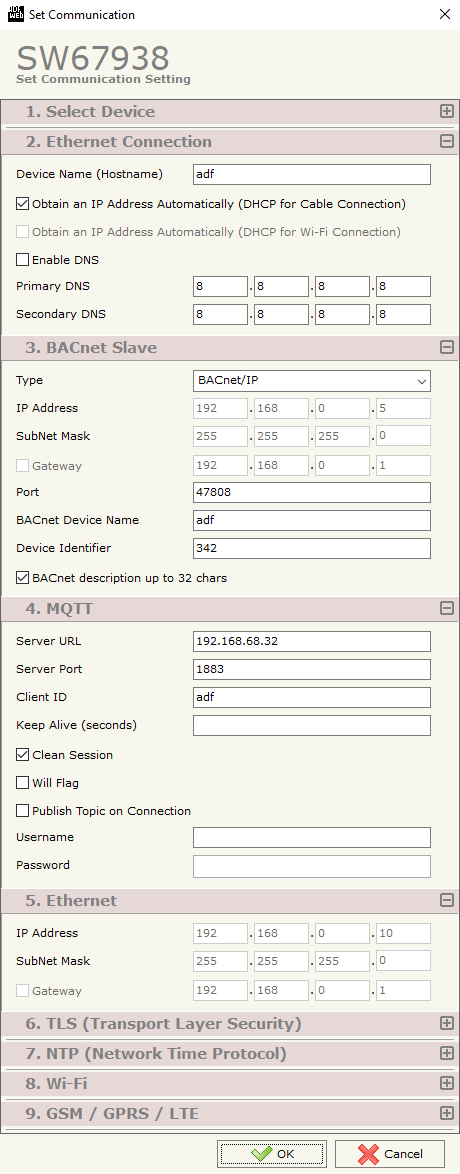
Click on the Set Communication button and enter the IP- and BACnet-settings you'd like to use for the device. Enter the IP-address of the Unipi device in section 4. MQTT.
MQTT Subscription
The example configuration contains 3 sensor-values from an Airthings for Business device mapped to 3 BACnet Analog Input objects. Please click on the MQTT Set Topic button and select the “MQTT Subscribe” tab to configure the Airthings for Business sensors you'd like to include in the gateway.
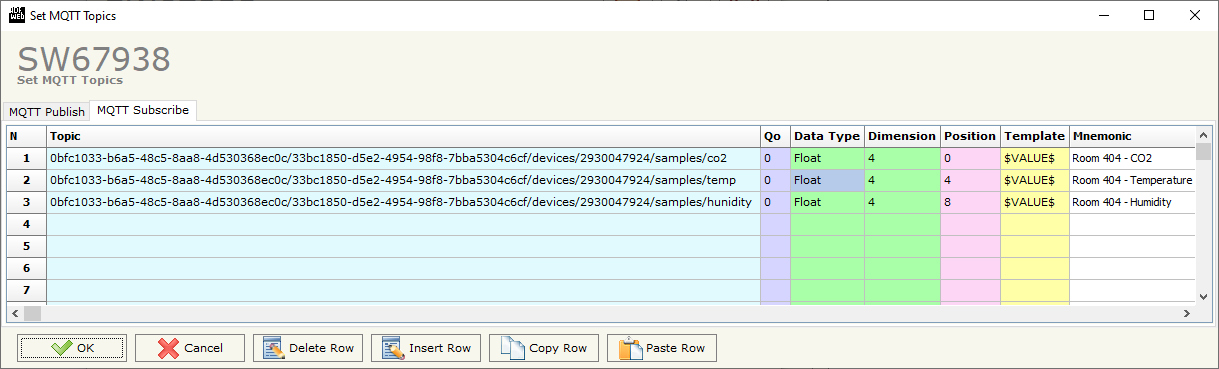
Replace the topic of the sensor you would like to receive values from with {accountId}/{locationId}/devices/{serialNumber}/samples/{sensor}, and increase the number in the “Position” column on each entry in the table by “4” (the size of each value stored to the memory of the device). To find the proper topic to be used, it can be simpler to explore the MQTT server in a client like “MQTT Explorer” and copy the topic from that software - there is an explanation for how to do this in the MQTT Bridge guide you've previously completed.
BACnet mapping
After all the sensors have been added to the MQTT Subscribe table, open the BACnet Set Access menu to map the sensors to BACnet objects.
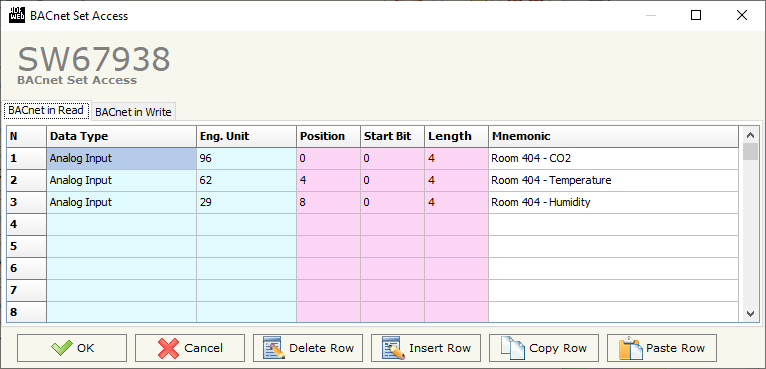
The “Position” column relates to the one in the MQTT Subscribe table, so make sure all of the sensors are mapped correctly in this table.
Uploading the configuration
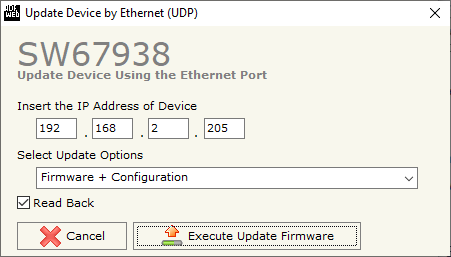
Once the configuration is completed, connect the device to your computer using an Ethernet cable, and set the “Dip1 of Dip-Switch A” on the device to the “ON” position before powering the device. The device will now start in “Boot mode” with the IP 192.168.2.205.
Set your computer's IP address to 192.168.2.200 and open the Update Device by Ethernet (UDP) menu in the ADF configuration software. Enter the settings in the image below before pressing the Execute Update Firmware button:
When the update is complete, power off the device, set the “Dip1 of Dip-Switch A” on the device to “OFF” position and connect it to the proper network before powering it back on. The device will now be available as a BACnet Server for all BACnet Clients on the same network, and data from the Airthings devices included in the configuration will be available on the defined BACnet objects.
Updated over 1 year ago