Glamox Heating integration
Use the API and MQTT to optimize Glamox Heating panel heaters
Using panel heaters to keep the desired temperature in your office can be challenging because the temperature sensors used to control the heaters are located on the actual heaters. The panel heaters will achieve the temperature you’ve set on their thermostats where they are located, but that will probably be very different from the temperature where people are located.
Using Airthings for Business devices with temperature sensors can help optimize heaters if they are connected to the cloud and offer an API to change their temperature setpoints. You can even use settings in the Airthings for Business Dashboard - like the opening hours of your building - to schedule when the heaters should lower their setpoints outside the opening hours to save energy.
This guide will explain how to do this in a simple way using Glamox Heating series 3001 panel heaters with a retrofitted WiFi module, but it can also be achieved with other connected Glamox Heating heaters, as well as Adax who have a completely similar app and API to Glamox Heating. We’ve used Node-RED - a completely free software that can run on a cloud service or a device of your choosing - as a tool to collect data from both Airthings and Glamox Heating and automatically adjust the temperature setpoints.
If you are using the Adax app and API, there is a section at the end of this guide explaining how to edit the configuration to use the Adax API instead. Follow the guide as if the heaters were Glamox Heating heaters, using the Adax app to set up the API client instead of the Glamox Heating app.
Requirements
To get this solution up and running, you will need the following:
- An active Airthings for Business account with sensor-device(s) registered to it
- A Node-RED instance (we’ve used FlowForge Cloud for this example)
- At least one Glamox Heating panel heater connected to the Glamox Heating app
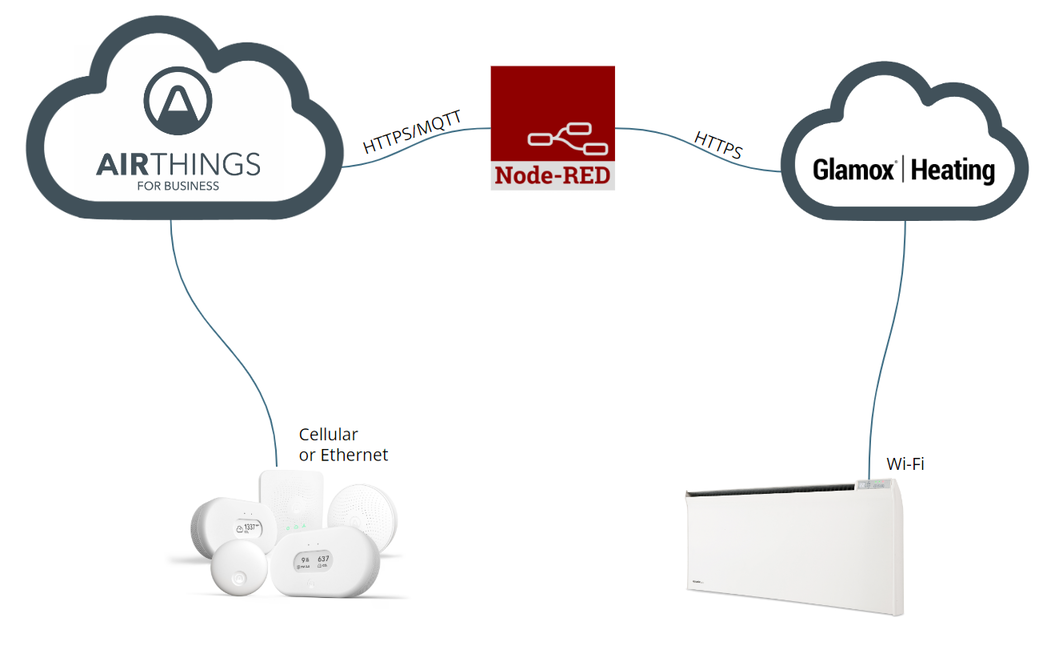
Connecting the services
We’re going to use the Airthings for Business RESTful API (HTTPS) to collect information about the buildings and devices, wile using MQTT to receive sensor samples whenever a connected device transmits data to the cloud. The Glamox Heating connection will be purely API (HTTPS) to collect information about the panel heaters and transmit temperature setpoints.
Airthings integration services
Let’s start by setting up the API client in the Airthings for Business Dashboard. To do this, simply navigate to Integrations → API, and click on New API Client.
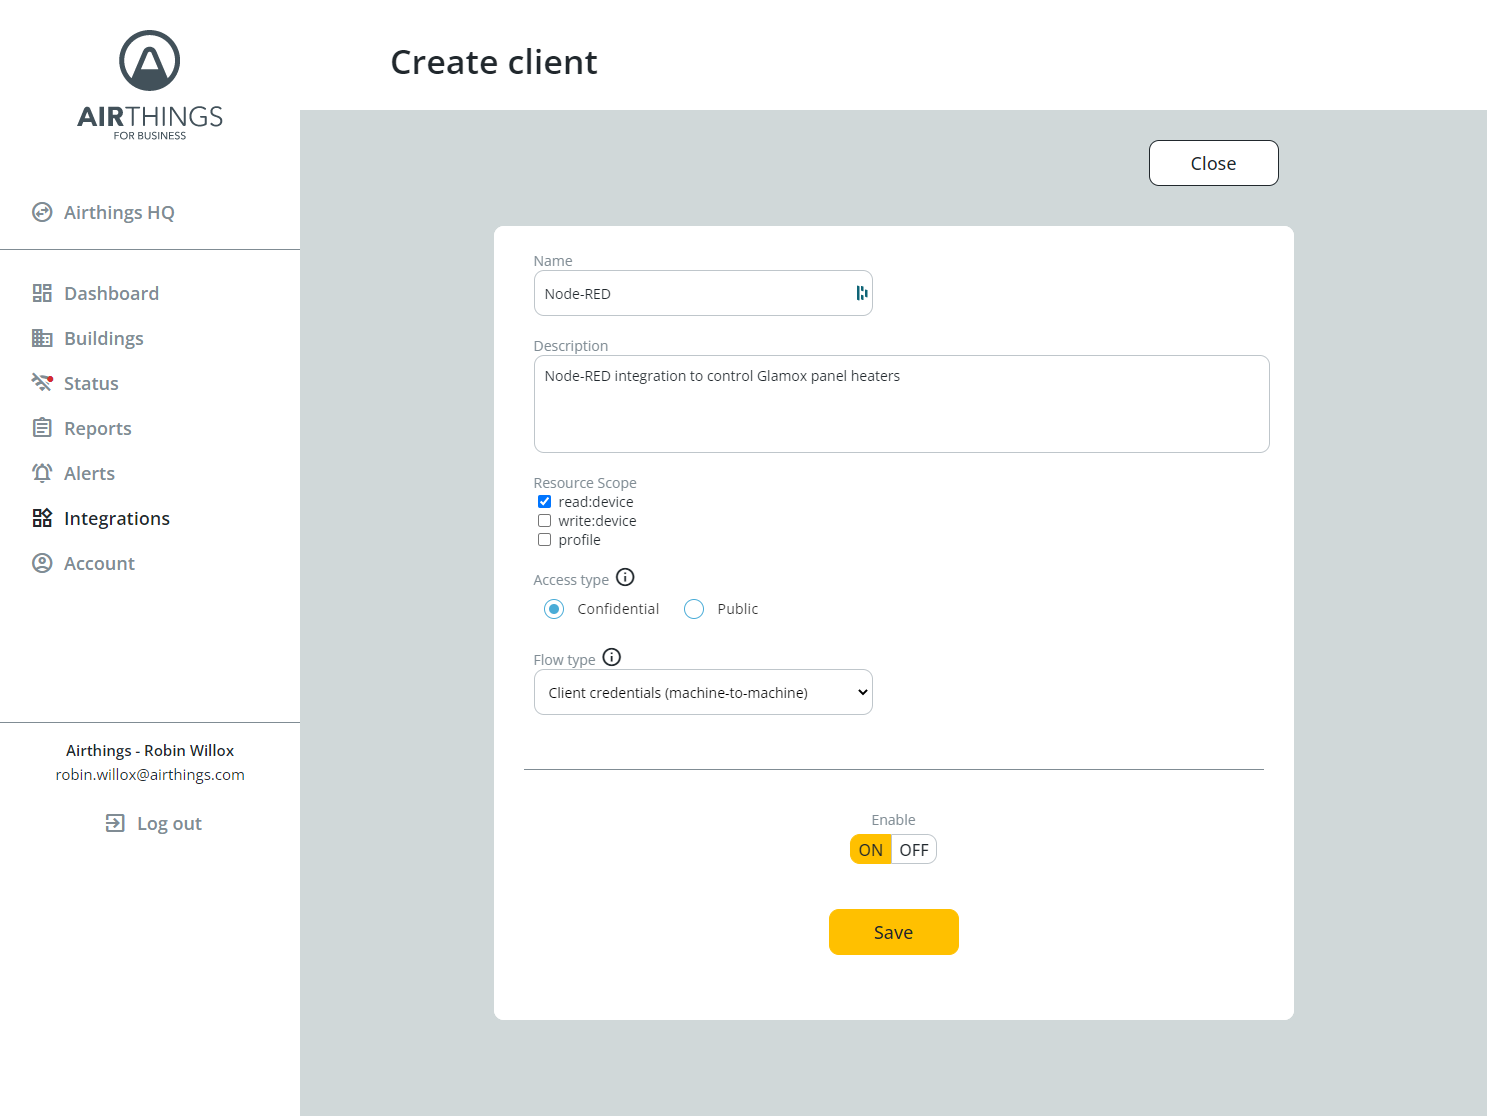
Name your API client, check read:device as resource scope, and use Confidential access type with Client credentials flow type. Activate the client and click Save. Once the client is saved, you’ll get a client ID and secret that you’ll use later when setting up authentication in Node-RED, so please store them in a document for now.
Next, let’s set up the MQTT client used to transmit sensor data to Node-RED. Select the MQTT tab in the Integrations menu and click on New MQTT Client.
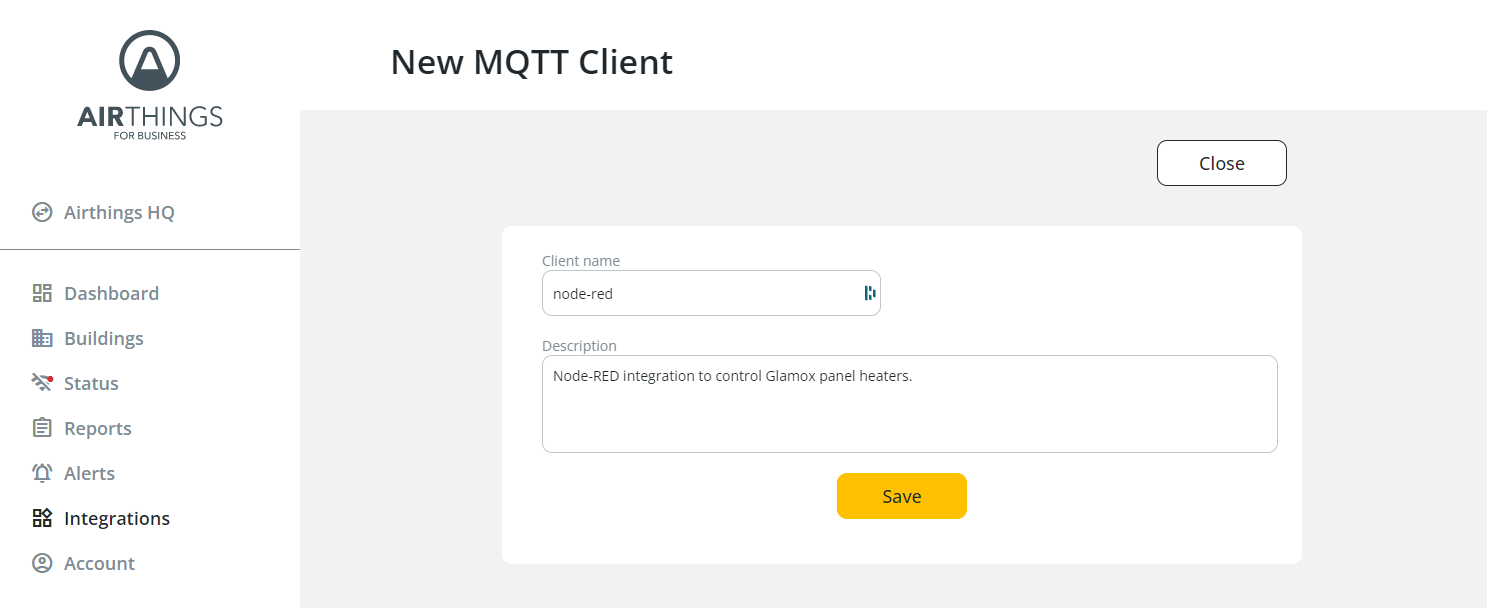
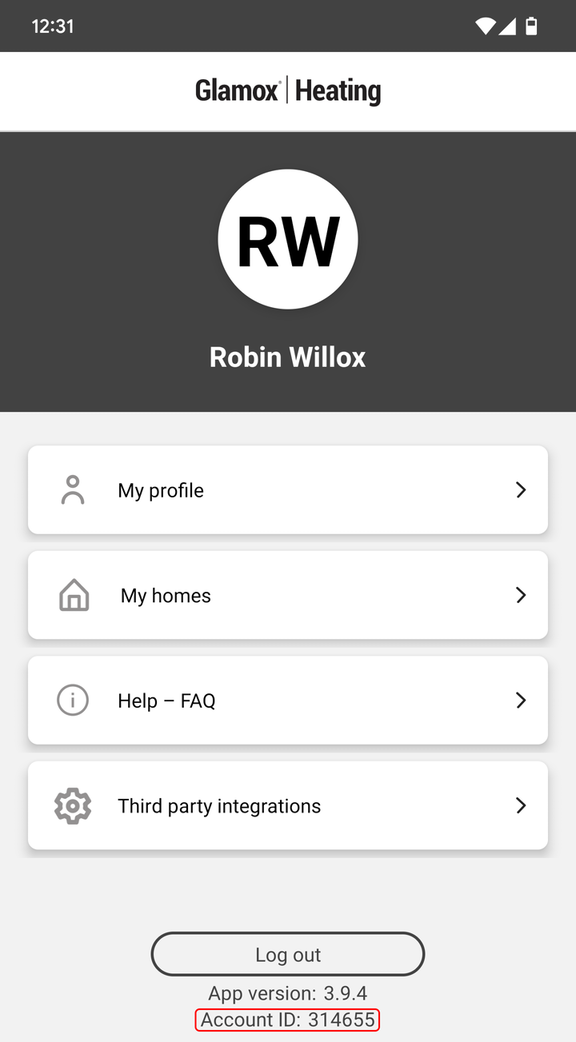
Name your client and click Save. You’ll get prompted to either download SSL certificates or upload your own, so please download the generated certificates to keep the authentication as simple as possible. When you get directed to the client setting page, please store the Account ID and the client name in a document to use later when setting up the connection in Node-RED. Check the All buildings checkbox, make sure the client is enabled, and click Save to finish the configuration.
Glamox API
To set up the Glamox Heating API client, open the Glamox Heating app and navigate to Account → Third party integrations → Remote API and click Add credential.
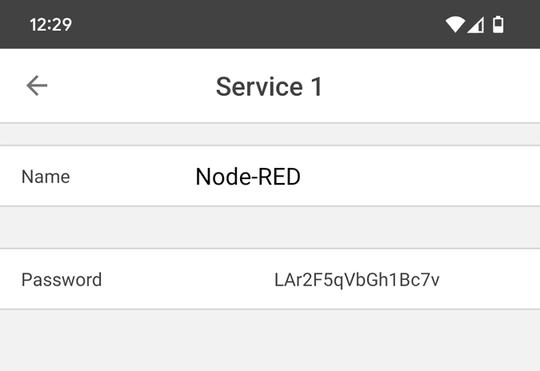
Type a name for your client, and store the password in a document to use later setting up authentication in Node-RED.
Navigate back to the Account page and store the Account ID located on the bottom of the page, as that will also be used to authenticate with the API in Node-RED as well.
Node-RED
To configure Node-RED, you should have the following prepared from the previous steps:
-
Airthings API client ID and secret
-
Airthings MQTT certificates, client ID and Account ID
-
Glamox Heating Account ID and API client password
If you are missing any of this, please repeat the previous steps to obtain what you are missing.
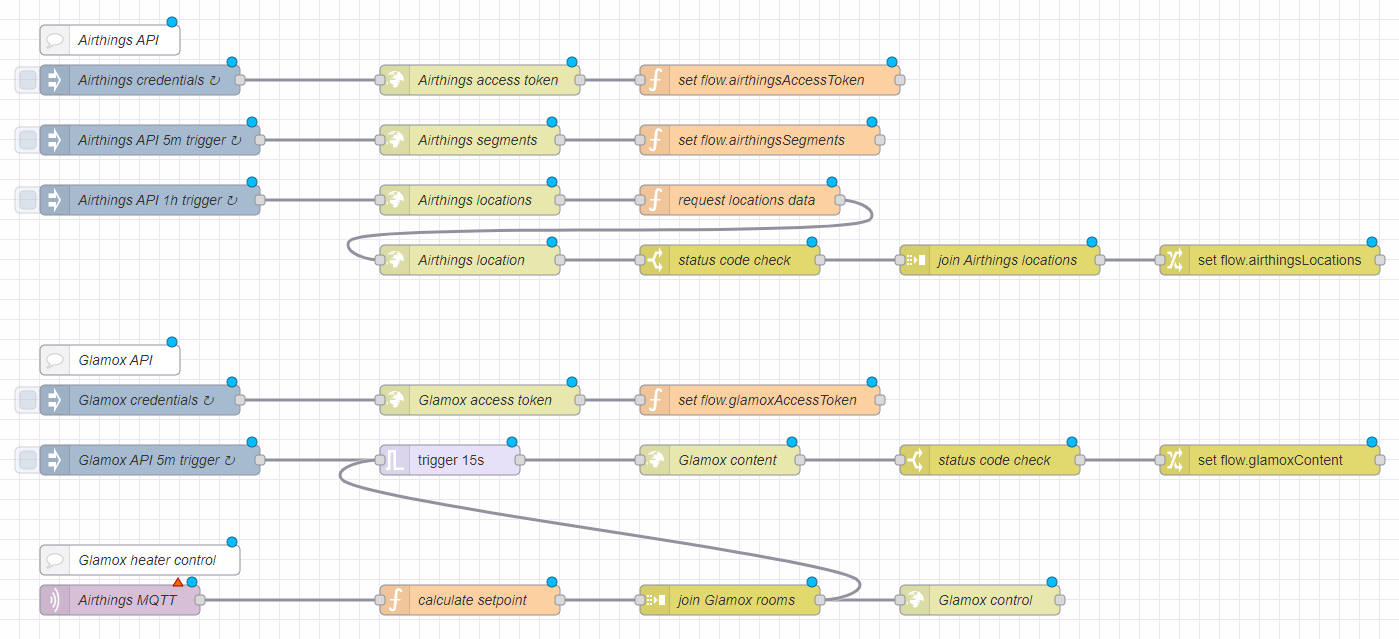
Import flow
In your node red instance, please import this flow by either clicking ctrl+i or navigating to the menu in the top right corner and clicking Import. Once the flow is imported, your Node-RED flow should look like this:
To connect to the different services, you’ll need to edit the nodes containing API and MQTT authorization settings.
Airthings API settings
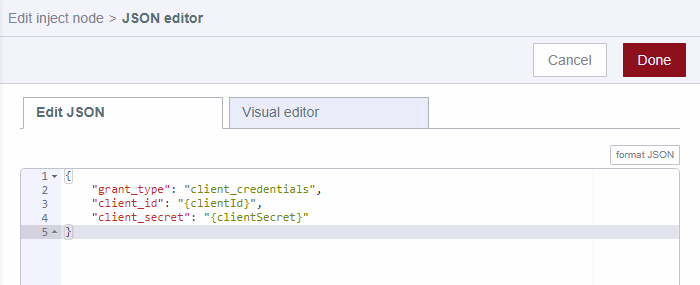
Open the node called “Airthings credentials” and click the “more” button next to the payload content to open the JSON editor.
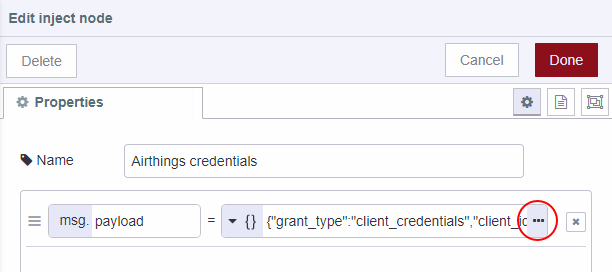
In the JSON editor, replace {clientID} and {clientSecret} with the Airthings API client ID and secrets (removing the brackets) and click Done to complete the configuration.
Your Airthings API client is now properly configured, and it will connect to start collecting data from the Airthings cloud once you’ve completed the rest of the configurations and deployed the flow.
Glamox Heating API settings
Open the node called “Glamox credentials” and replace {accountId} and {clientPassword} in the payload content with the Glamox Heating account ID and API client password (removing the brackets), and click Done to complete the configuration.
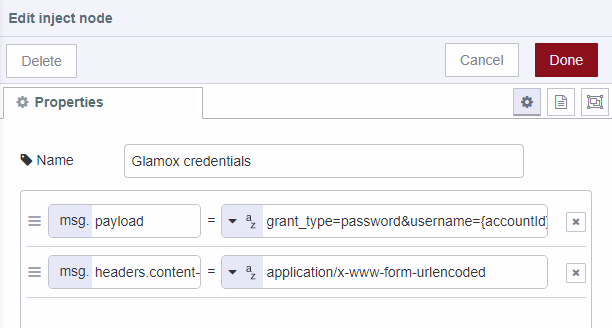
Your Glamox Heating API client is now properly configured, and it will connect to start collecting data from the Glamox Heating cloud once you’ve completed the rest of the configurations and deployed the flow.
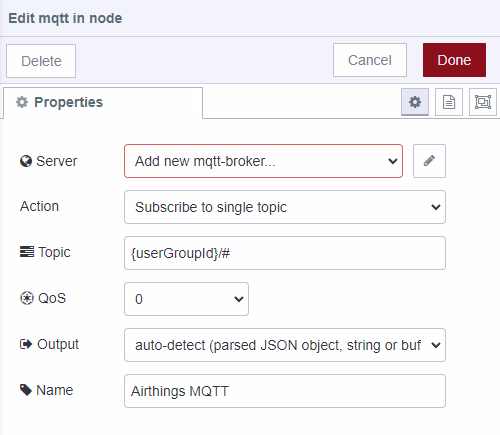
Airthings MQTT settings
Open the node called “Airthings MQTT” and replace {accountId} with your Account ID (removing the brackets). Click on the edit-pencil next to “Add a new mqtt-broker…” to configure the broker connection.
Enter the following settings in your MQTT broker configuration:
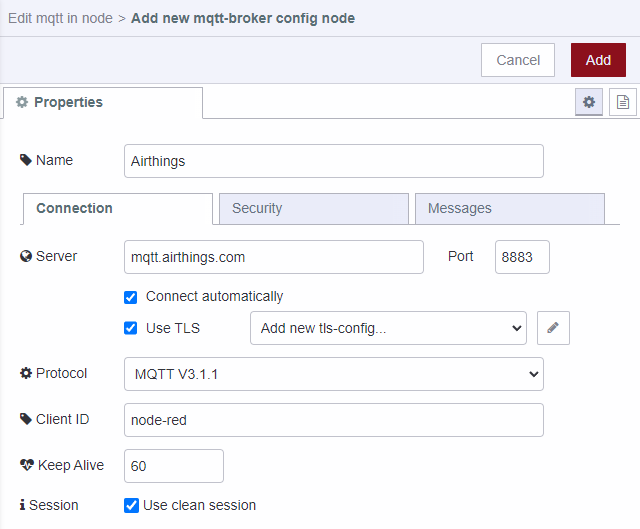
Replace the “Client ID” with the name of your Airthings MQTT client in case you used a different name than “node-red”, and click on the edit-pencil next to “Add a new tls-config…” to add the certificates required to authenticate with the MQTT broker.
Extract the previously downloaded certificates from their .zip-file and upload the .cert file to the Certificate, and the .key file to the Private key.
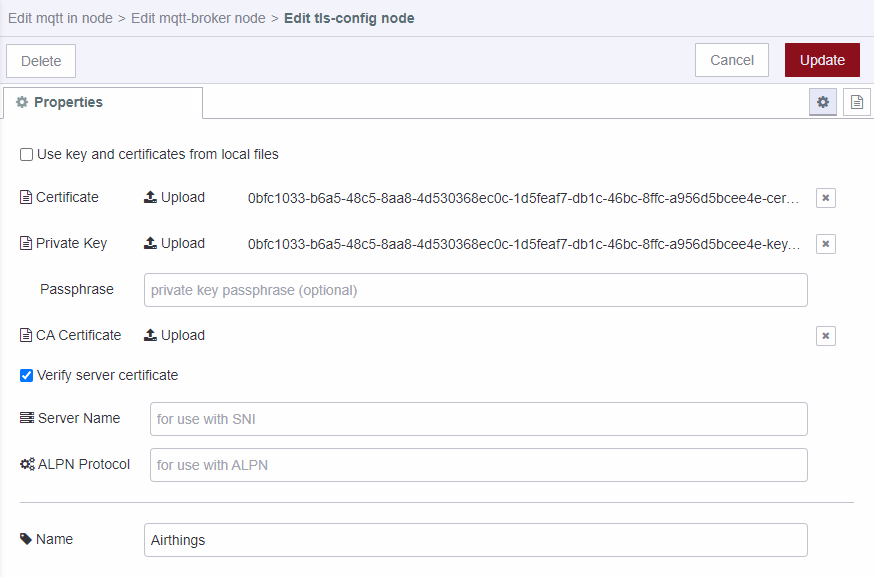
Click Update → Update → Done to close and save the MQTT configuration.
Deploy flow
You have completed the Node-RED configuration, and you’re ready to deploy it to start controlling your Glamox Heating heaters using temperature data from Airthings for Business devices. To do this, simply click Deploy in the top right corner.
Configuring the solution
The last part of this guide will be to connect the Airthings devices to the correct Glamox Heating heaters and define the setpoints for each room. This is the only thing required when devices are added or removed, there are no additional configurations required in the Node-RED instance or integration services.
Unoccupied setpoint
To save energy when the building is unoccupied, make sure you’ve entered the correct opening hours for your building in the Airthings for Business Dashboard. To do this, open the Dashboard and navigate to Buildings → {your building} → Settings → Building settings, enable opening hours and enter the correct opening hours.
Next, expand Custom labels and add a label named nightTempSetpoint with the temperature you want to set for the panel heaters when the current time is outside the building’s opening hours. Also add a label named glamoxHome with the name of the location (home) in the Glamox Heating app.
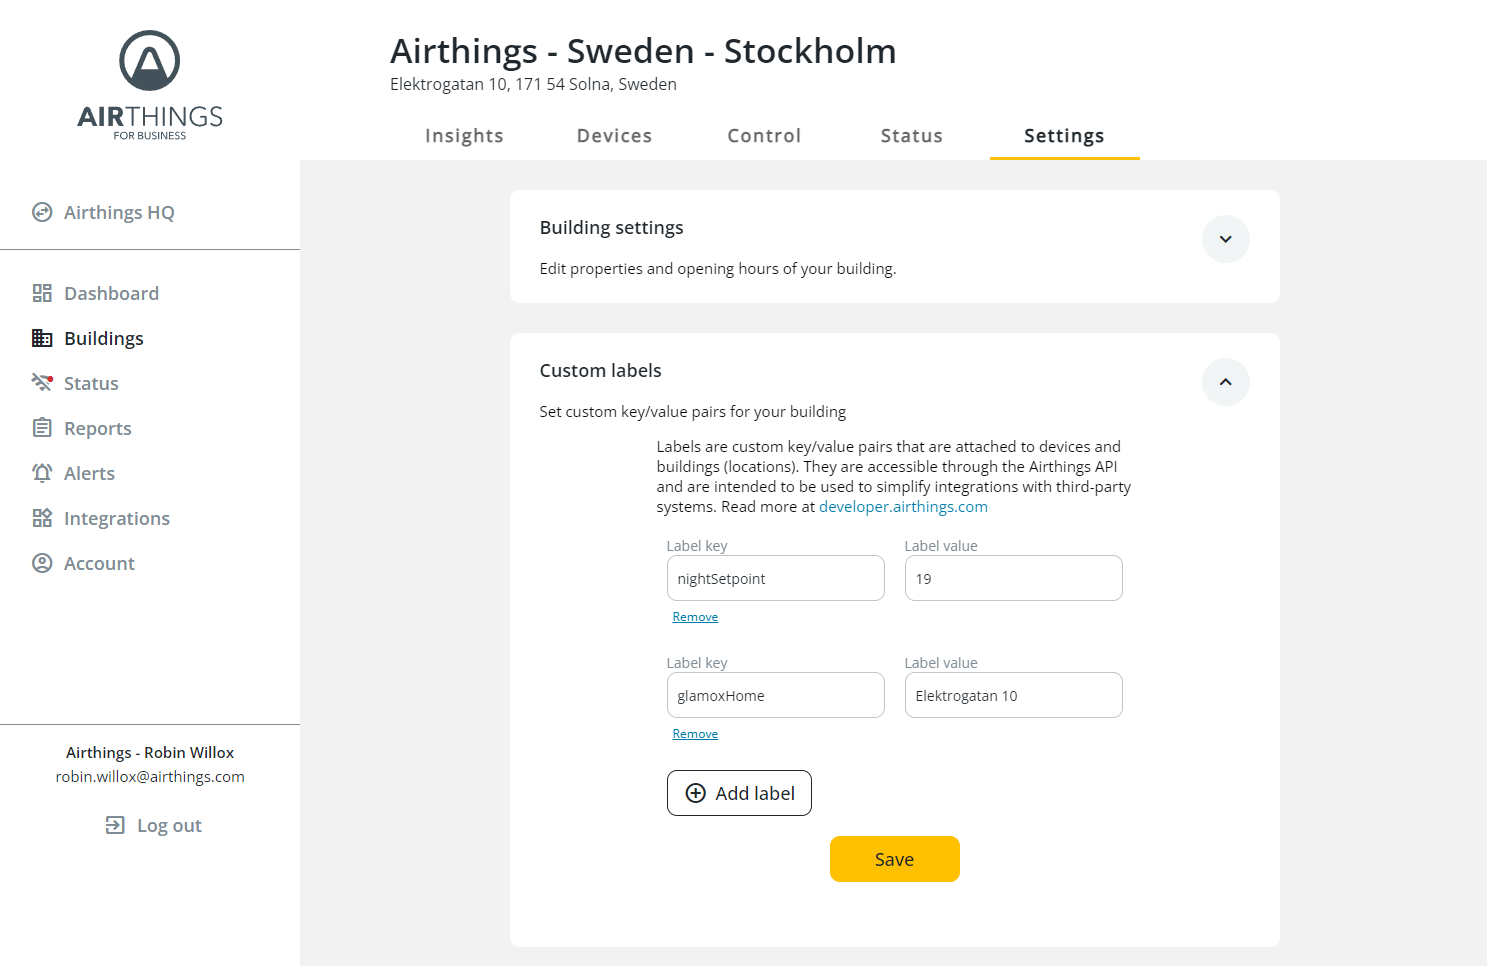
Click Save to apply the settings. If the nightTempSetpoint label isn’t added, the panel heaters will be set to 17°C outside opening hours.
Device connection
Click the Devices tab while browsing your building in the Dashboard, and select the device you want to link to a room in the Glamox Heating app. In the device page, open the Settings tab, expand Custom labels and add the label glamoxRoom with the room name from the Glamox Heating app as the value. Also add the label tempSetpoint to use as the setpoint you’d like to use for the room when the current time is within the building’s opening hours.
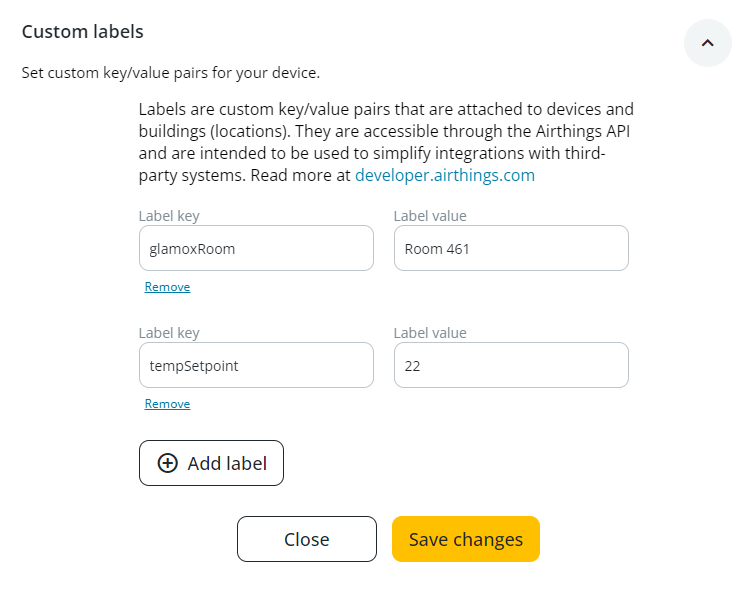
Click Save changes to apply the settings, and repeat for every room you have both Airthings for Business devices and Glamox Heating heaters registered to each of the accounts.
Summary
Congratulations on properly configuring the Airthings for Business and Glamox Heating heaters to optimize temperature and reduce energy costs for your building!
If you’d like to add new devices to your building, simply add the correct labels to the devices in the Airthings for business Dashboard and they will automatically change the setpoint of the configured room in the Glamox Heating app. If you’d like to apply this solution to additional buildings in your account, all you need to do is to register the devices in new buildings in both the Airthings for Business Dashboard and the Glamox Heating app, and repeat the final steps in “Configuring the solution” section.
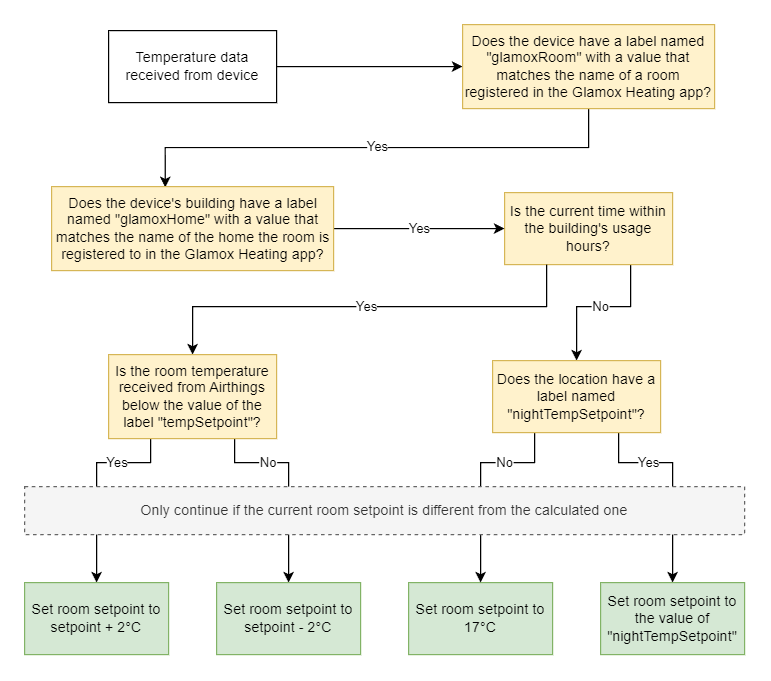
The Node-RED flow automatically connects the devices and setpoints based on the available data and configured labels, please take a look at this simplified flow to get an overview of how the flow works:
Feel free to edit and improve the flow if you’d like, and add multiple integrations and settings if needed.
Adax heaters
If you are using Adax heaters instead of Glamox Heating heaters, all that is required is to make an adjustment to the URL used to connect to the Adax API in Node-RED. Simply open the nodes “Glamox access token” and “Glamox content” and replace the glamoxheating.com part of the URL with adax.no. Your flow will now connect to the Adax API instead of the Glamox Heating API.
You can replace the “Glamox” name in all of the labels, nodes, functions, etc. if you want, but that is not required for the solution to work properly.
Updated over 1 year ago