Getting started
The Airthings MCP connector lets AI assistants query your Airthings workspace directly (i.e. live sensor readings, device status, and historical air quality data) without building a custom API integration. This guide walks you through connecting the MCP server and making your first queries.
Note: The Airthings MCP is read-only. It can fetch and report data but cannot modify device settings or write data back to your account.
Prerequisites
Before you begin, make sure you have:
-
An Airthings Business account with admin access to at least one account, and an active subscription
-
An MCP-compatible AI client, such as Claude
-
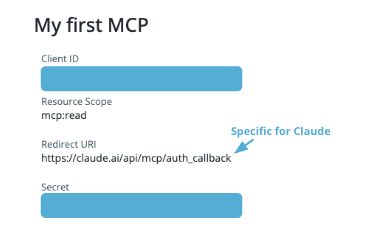
Airthings MCP credentials (client ID and client secret)
- Generate these at dashboard.airthings.com under Settings → Integrations → MCP
- When creating the credentials, you'll be asked for a redirect URI. If you're connecting from Claude, use:
https://claude.ai/api/mcp/auth_callback
Connecting the MCP Server
The Airthings MCP server URL is:
https://mcp.airthings.com/mcpClaude (Anthropic)
Note: On Claude Enterprise or Team plans, an admin may have already added the Airthings connector for your organization. Check your Connectors list before adding it manually.
- Open claude.ai or Claude Cowork (desktop app)
- Go to Settings → Connectors
- Click Add custom connector
- Enter:
- Name: Airthings (or any name you prefer)
- MCP server URL:
https://mcp.airthings.com/mcp - Client ID and Client secret from the Airthings dashboard
- Click Connect and authorize with your Airthings login
- Start a new conversation, the Airthings tools are now available!
Token usage notice: Airthings MCP queries consume tokens from your Claude plan. Accounts with large portfolios (many buildings, devices, or long data histories) will consume significantly more tokens per query. If you manage a large deployment, monitor your usage closely and consider scoping queries to specific buildings or time periods where possible.
Making Your First Queries
Once connected, try these prompts to verify the integration is working:
1. List your organisations
"List my Airthings organisations"This calls airthings-list-accounts and returns all accounts you have admin access to.
2. Check live sensor readings
"What are the current CO₂ and radon levels in [location name]?"The assistant will discover your devices and call airthings-get-current-readings for all sensors in that location.
3. Review device health
"Are all devices online in [location name]? Any low batteries?"This uses airthings-get-location-status to give a fleet overview without querying each device individually.
4. Analyse historical trends
"Show me the radon trend for the past week in [location name]"5. Find evidence for a complaint
"Someone in [location name] has complained about air quality [time period]. I need an evidence package to attach to the ticket."6. Regulatory verification
"Are our CO₂ levels in the [location name] within [country or state] workplace regulations?"The assistant selects an appropriate resolution and calls airthings-get-sensor-history automatically.
Updated about 1 month ago